
Classic Red Velvet Brownies with Cheesecake Layer Recipe
Introduction
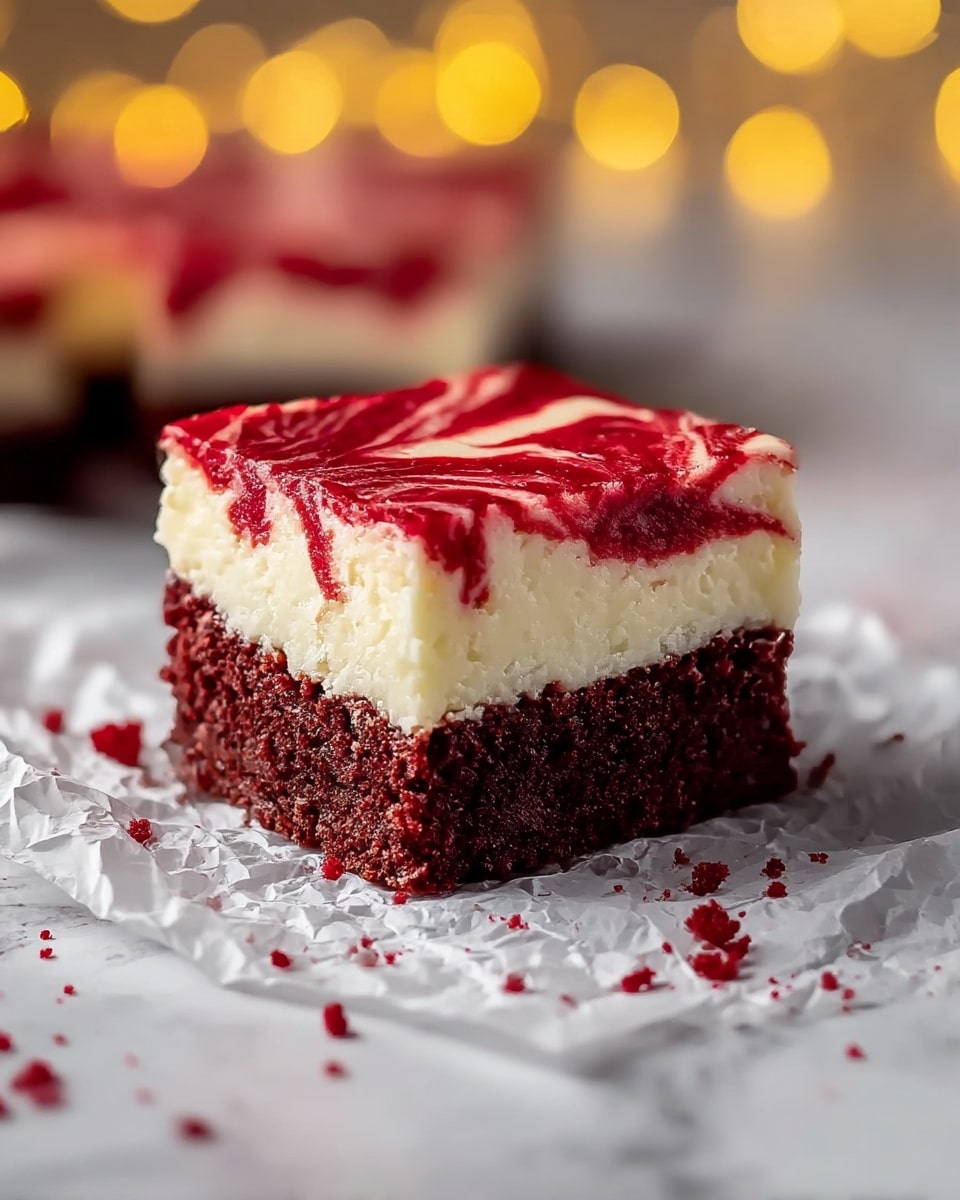
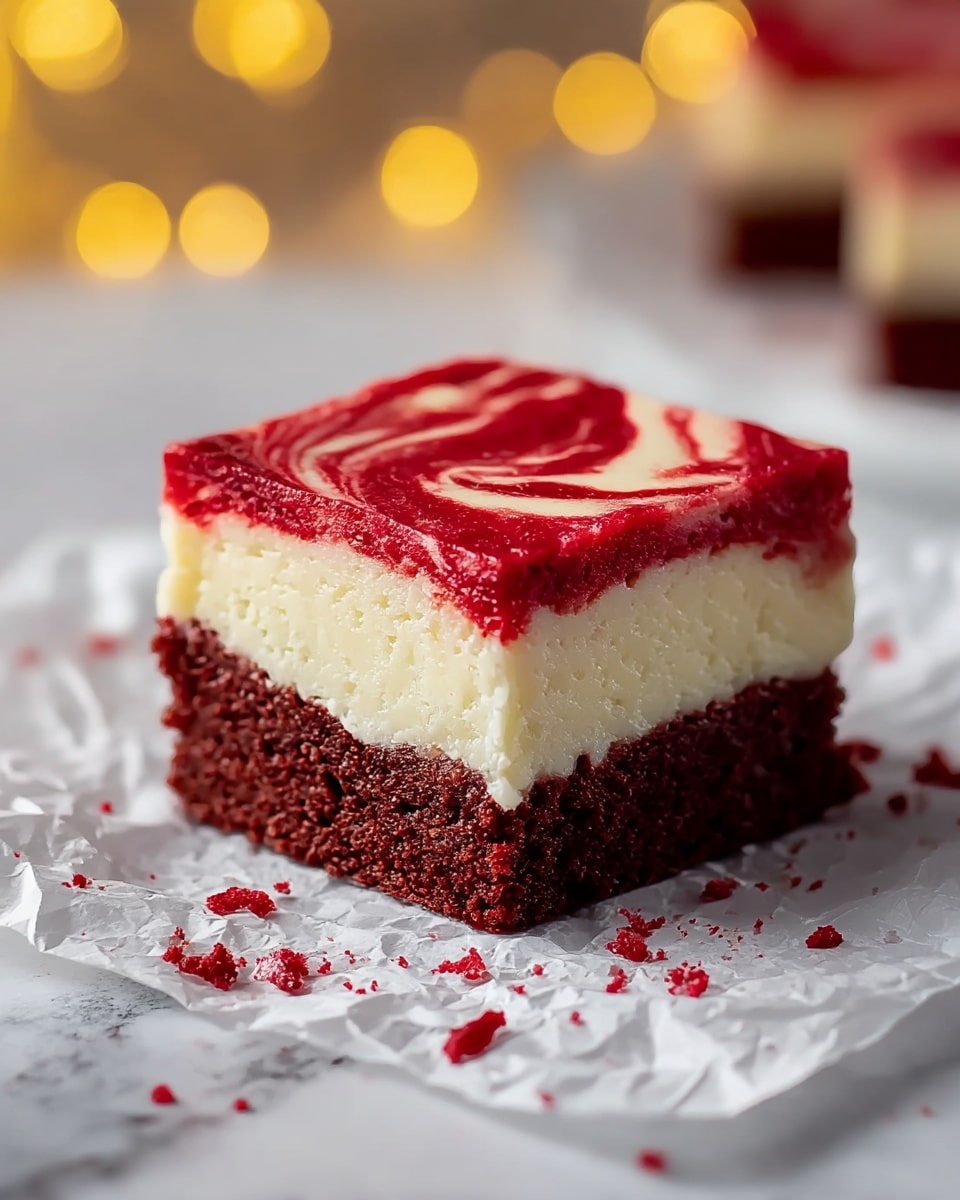
These Classic Red Velvet Brownies with a creamy cheesecake layer are the perfect blend of rich chocolate and tangy sweetness. With their striking marbled look and fudgy texture, they’re an elegant treat that’s surprisingly easy to make at home.
Ingredients
- For the brownie layer:
- 5 oz butter (preferably Kerrygold unsalted)
- 3/4 cup sugar
- 1 1/2 tsp vanilla extract
- 1/3 cup cocoa powder (Hershey’s Special Dark recommended)
- 1/8 tsp salt
- 1 1/2 tbsp red food coloring
- 1 tsp vinegar
- 2 large eggs (room temperature, about 70°F)
- 3/4 cup flour
- For the cheesecake layer:
- 8 oz cream cheese (softened, Philadelphia original blocks recommended)
- 1/4 cup sugar
- 1 large egg
- 1/2 tsp vanilla extract
Instructions
- Step 1: Preheat your oven to 375°F. Grease an 8×8 inch baking dish or 9-inch square pan thoroughly with butter or cooking spray to prevent sticking.
- Step 2: Melt the butter in a medium saucepan over low heat. Remove from heat and stir in the sugar until combined. Add vanilla, cocoa powder, salt, red food coloring, and vinegar, mixing until the mixture turns a deep burgundy color and the cocoa is fully incorporated.
- Step 3: Beat the room-temperature eggs lightly in a small bowl, then add them to the chocolate mixture and stir until smooth. Gently fold in the flour with a spatula until just combined—avoid overmixing. Reserve 1/4 cup of this batter for the top layer and set aside.
- Step 4: Pour the remaining red velvet brownie batter into the prepared baking dish and spread evenly, covering the bottom and corners.
- Step 5: In a separate bowl, beat the softened cream cheese with sugar until smooth and fluffy, about 1-2 minutes. Add the egg and vanilla extract, beating until fully combined and creamy without lumps. Spread the cheesecake mixture evenly over the brownie batter.
- Step 6: Spoon the reserved 1/4 cup of red velvet batter in small dollops on top of the cheesecake layer. Use a thin knife or skewer to gently swirl the batters in a figure-8 or back-and-forth motion to create a marbled pattern. Be careful not to overmix.
- Step 7: Bake for 30-35 minutes, until the top is set but still slightly jiggly in the center. The edges should pull slightly away from the pan. Remove from oven and let cool on a wire rack for 1-2 hours.
- Step 8: For best results, refrigerate the brownies for at least 1 hour after cooling to allow the layers to set and the cheesecake to firm up before cutting into squares.
Tips & Variations
- Use high-quality unsalted butter like Kerrygold for a richer, more flavorful brownie base.
- Room temperature eggs help the batter mix smoothly and prevent curdling.
- For a festive twist, add mini white chocolate chips or chopped pecans to the brownie batter before baking.
- Red food coloring intensity can be adjusted to achieve your preferred shade of red velvet.
- Try swapping vanilla extract in the cheesecake layer for almond extract for a subtle nutty flavor.
Storage
Store these brownies in an airtight container in the refrigerator for up to 5 days. They can also be frozen for up to 2 months; thaw overnight in the fridge before serving. Reheat individual portions gently in the microwave for about 15 seconds if desired, but they are delicious enjoyed cold or at room temperature.
How to Serve
Serve this delicious recipe with your favorite sides.
FAQs
Can I use a different pan size for these brownies?
An 8×8 inch or 9-inch square pan works best for even baking and layer proportions. If using a different size, adjust the baking time accordingly and keep an eye on the texture, as thinner layers may bake faster.
Why is vinegar added to the brownie mixture?
Vinegar helps activate the baking soda (if included) and enhances the tangy flavor associated with red velvet. It also contributes to the deep red color developing during baking.
Print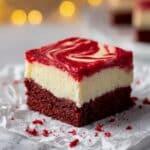
Classic Red Velvet Brownies with Cheesecake Layer Recipe
- Total Time: 1 hour 50 minutes (includes cooling and chilling time)
- Yield: 16 brownies (cut into 2-inch squares) 1x
Description
Classic Red Velvet Brownies with a luscious cheesecake layer combine rich cocoa and vibrant red color with a creamy, tangy cheesecake topping. These fudgy, marbled treats are perfect for any dessert lover seeking a visually stunning and delicious twist on traditional brownies.
Ingredients
Brownie Layer
- 5 oz unsalted butter (preferably Kerrygold for richer flavor)
- 3/4 cup sugar
- 1 1/2 tsp vanilla extract
- 1/3 cup cocoa powder (Hershey’s Special Dark recommended)
- 1/8 tsp salt
- 1 1/2 tbsp red food coloring
- 1 tsp vinegar
- 2 large eggs, room temperature (about 70°F)
- 3/4 cup all-purpose flour
Cheesecake Layer
- 8 oz cream cheese (Philadelphia original blocks, softened)
- 1/4 cup sugar
- 1 large egg
- 1/2 tsp vanilla extract
Instructions
- Preheat and Prepare Pan: Preheat oven to 375°F. Grease an 8×8 inch baking dish or 9-inch square pan evenly with butter or cooking spray to prevent sticking and ensure clean brownie removal.
- Make Brownie Batter: Melt butter in a medium saucepan over low heat. Remove from heat and stir in sugar until combined. Add vanilla, cocoa powder, salt, red food coloring, and vinegar, mixing thoroughly to achieve a deep burgundy color. Beat room-temperature eggs lightly, then add to the mixture and stir until smooth. Gently fold in flour with a spatula until just combined, being careful not to overmix. Reserve 1/4 cup of batter for topping.
- Layer Brownie Base: Pour the majority of the brownie batter (about 3/4 of the total) into the prepared pan, spreading evenly to fill all corners. This forms the fudgy base of the brownies.
- Prepare Cheesecake Layer: In a separate bowl, beat softened cream cheese with sugar until smooth and fluffy, about 1-2 minutes. Add egg and vanilla, mixing until creamy with no lumps. Spread this cheesecake mixture evenly over the brownie base layer, taking care not to disturb the base.
- Top with Reserved Batter and Swirl: Spoon the reserved brownie batter in small dollops over the cheesecake layer. Using a thin knife or skewer, gently swirl the batters together in figure-8 or back-and-forth motions to create a marbled effect without overmixing.
- Bake: Bake for 30-35 minutes until the top is mostly set but still slightly jiggly in the center. The edges should pull away from the pan slightly. Remove from oven and allow to cool on a wire rack for 1-2 hours.
- Chill for Best Results: Refrigerate the brownies for at least 1 hour after cooling to fully set and firm the cheesecake layer, enabling cleaner slicing.
Notes
- Use room-temperature eggs for better batter incorporation.
- Do not overmix the batter when folding in flour or swirling to maintain texture and distinct layers.
- Refrigeration helps set cheesecake layer and improves cut quality.
- Kerrygold butter enhances richness but can be substituted with any unsalted butter.
- Use a gentle swirling motion to create beautiful marbling without blending layers completely.
- Prep Time: 15 minutes
- Cook Time: 35 minutes
- Category: Dessert
- Method: Baking
- Cuisine: American
Keywords: red velvet brownies, cheesecake brownies, layered brownies, marbled desserts, chocolate brownies, creamy cheesecake
